Best eLearning Voice Over Recording Tips
Best eLearning Voice Over Recording Tips
Today we are going to go over the best eLearning voice over recording tips covering these three areas: acoustics, equipment, and EQ processing. We will especially keep in mind how to handle longer programs over a half an hour in length. With such modules, one would want to use lower bit audio (64 kbps or lower) in Captivate or Articulate, etc. All the tips discussed here will guarantee great sounding eLearning voice overs whether you have output .mp3 audio at 128 kbps or 56 kbps.
Always start with acoustics
A good acoustic environment is essential for eLearning voice over recording. With few exceptions, there is no music or sound effects hiding the background noise and reverberant sound that cut into the intelligibility of the narrator’s voice. You need clear sound with no distractions. Being able to hear the size of the room or a faint rumble or hiss, is distracting over a long program, or even after a few minutes.
My studio is acoustically treated with acoustic panels from GIK Acoustics and professional sound blankets from Vocal Booth to go. I record in a large office, not a booth. Booths can be fine, but I think they sound ‘tubby’. The microphones are over ten feet away from any windows or other hard surfaces. I even have carpeting covering my desk. My mics are kept away from the computer screen to minimize ‘early reflections’ of sound which can be just as annoying as larger room reverberations. The HVAC goes into shutdown mode before I record. Last but not least, I stay well hydrated and make sure I’ve eaten to avoid mouth noises and stomach rumbles!
Equipment for eLearning Voice Over: Simple and Clear
Recording equipment has improved a lot in the past decade. The new microphones and audio interfaces are excellent. There’s no need for a very expensive microphone for eLearning voice over recording. In fact many of the ‘go-to’ studio microphones for commercials and film pick up too much of the room noise. I use a Rode NT1, Rode NTG3 and a Rode Procaster, for example. The NT1 is a condenser mic that has extremely low self noise. Any self noise under 14dBA is great, but this one goes down to 4.5 dBA. It also has a very tight polar pattern, so it doesn’t pick up as much noise off to the sides – just the voice. The NTG3 has a tighter polar pattern and has a very big sound, which is appropriate for some projects. The Procaster is a dynamic mic which rejects even more room noise.
A high quality dynamic microphone like the Procaster, RE20, or Shure SM7b can be a great choice for eLearning voice over. However, make sure you have a very clean preamp that can handle the high gain levels required by a dynamic microphone. Also be sure to use proper mic technique to avoid plosive sounds/popped “P”s. Speaking of preamps, many of today’s audio interfaces have very clean and powerful built-in microphone preamps at much more affordable prices than ever before. Expensive outboard boutique preamps will only provide diminishing returns towards a great sound for eLearning. They will only introduce more noise into the signal chain. And you definitely want to avoid preamps with the noise of tubes, or noticeable transformers that ‘color’ the sound with flattering harmonics. Those are great for trailers and commercials. We are focused on the best eLearning voice over recording Tips.
EQ Processing for eLearning
Recently an eLearning voice over client I’ve worked with for over twelve years sent me a link to one of their finished eLearning modules. I had never watched their modules before. I was very impressed by the presentation, and the audio sounded great. However, the .mp3 output audio didn’t represent the quality of the eLearning voice over recording .wav. The high end frequencies had that swirly, artifact-laden effect one hears often with low resolution audio of 64 kbps .mp3s.
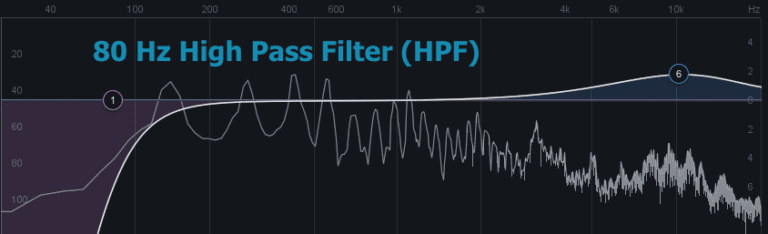
I immediately asked them if the audio was 56 kbps. Indeed it was. I suggested that I process the .wav files I sent them going forward with EQ to pull down the unnecessary frequencies. Basically, at such low resolution, you don’t need frequencies below 100 Hz, and you don’t need frequencies above 10 kHz for the voice to sound intelligible, clear, and full. Otherwise, it’s like trying to fit too many ingredients into a small pot: you wind up with the “swirliness” instead of flavors being blended nicely together. High and low frequencies will stand out in a granular way, instead of sounding smooth. In other words, less is more when rendering to low-resolution .mp3. Here are the settings I use for processing EQ for eLearning voice overs:
- -18 dB to -24 dB per octave HPF (High Pass Filter/Low Cut Roll-Off) at 100 Hz.
- -12 to -18 dB per octave LPF (Low Cut Filter/ High Cut Roll-Off) at 10 kHz.
Compare and contrast: EQ vs. no EQ for Elearning voice over
Listen here to an eLearning voice over recording without the EQ, output to 56 kbps:
Compare that to the same voice over with my HPF and LPF EQ settings, output to 56 kbps:
As you can hear, taming the high and low ends makes for a better mp3 for Articulate and Captivate, etc. Be sure to apply the EQ before/during the rendering of the .wav file before importing and down-converting to lower resolution .mp3s.
For even more tips on setting up your recordings for eLearning with a special look at room acoustics and furniture set-up, see “Creating the Perfect Home Studio for Beginners” by Carlos Trejos.
Thank you for listening and reading, and good luck with your eLearning projects!
All the best,
Lance Blair