Recording Voiceovers with REAPER
Switching from Audition and ProTools to REAPER
More and more of my colleagues have been asking me about recording voiceovers with REAPER instead of Audition or ProTools. Others are looking for a DAW that would be an upgrade from, say, Audacity or Twisted Wave. REAPER is a fantastic, affordable, powerful DAW with everything you need for recording voiceovers. It has the full capacity to work with video sync and to use Source-Connect for remote sync and dubbing. I’ve been asked about and blogged about how to make REAPER work like Audition back in 2018 when I switched to REAPER as my main DAW. However, I’ve recently received more detailed questions about switching to REAPER, so let’s revisit the topic more comprehensively. We’ll look at:
1.) How to make REAPER work like Adobe Audition in Waveform Editor Mode (but non-destructively!)
2.) How to save a highlighted section like in Audition Waveform Editor Mode
3.) How to Batch Process and
4.) How to do Spectral Edits. Let’s go!
Recording Voiceovers with REAPER like Adobe Audition Waveform Mode
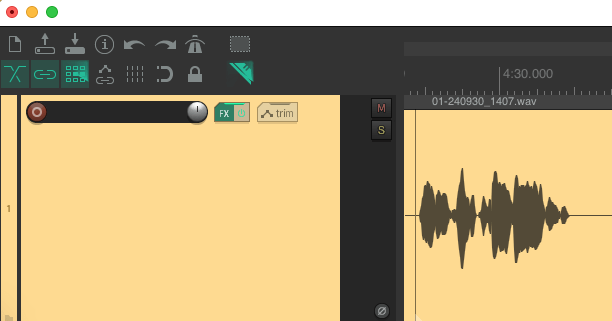
Since the release of REAPER 7.0 in October 2023 REAPER introduced a new Razor Edit Mode which works like the Adobe Audition Waveform Editor Mode. All you have to do is click on the Razor Icon in the top left corner. The icon will turn green when activated. Then left-click over the area you wish to cut, and select Command X or whatever key for Cut you are using. If you have multiple tracks, make sure to turn off “Ripple Editing” by pressing Alt + P so that edits only affect the track that you are working on. This will cut and heal the audio from the selected track only, and all other tracks will stay in place.
Note: Audition Waveform Editor Mode edits are destructive. But when you record and edit with Razor Edit Mode, it is non-destructive, so you can return to previous versions of an edit or recording. When you make an edit in the convenient Audition Waveform Editor, it is permanent. Recording voiceovers with REAPER combines Audition’s conveniences for editing single voice over tracks with the power of non-destructive editing.
Take “Action” to Make REAPER Work for You
If you have an earlier than 7.0 version of REAPER without Razor Edit Mode, it takes just five minutes to set up REAPER to work like a non-destructive version of Adobe Audition Waveform Editor Mode. After this customization you’ll never have to pay that Adobe monthly extortion payment, er, I mean subscription again. This setup customization also works with the latest versions of REAPER. One of the joys of recording voice overs with REAPER is that it is highly customizable, and you can program all kinds of actions to suit your workflow. For example, I’ve programmed my “A” key to advance the cursor to the last edit point in the track. So, with a few tweaks in the Actions Menu, you can make REAPER work like Adobe Audition Waveform Editor mode. Here’s how you can do it:
A.) First go to the “Actions” menu and select “Show Actions List”. Click on “New Action” at the bottom of the Actions section.
B.) Drag and drop these actions into the custom actions section in this order: 1.) “Set Ripple Per Track” 2.) “Item: Split Items at Time Selection” 3.) “Time Selection: Remove contents of time selection (moving later items)” 4.) “Go to end of time selection” 5.) Name the Action (Such as “Time Selection Delete”) and press “OK”
C.) Go to the Actions Menu again and choose “Show Actions List”
D.) Finally, set a shortcut key and name for these Custom Actions. I chose “Delete”; and then also set the “0” key for deleting sections of track items to be able to do that as well.
Note: the cuts made with this method will affect all tracks unless you turn off Ripple Editing (Alt +P). So, make sure you are only working with one voice over track, as is the case with Audition Waveform Editor Mode.
If you need to Punch and Roll for your recording, there is a great new tutorial explaining how to do it, called “Punching into Narration in REAPER” on YouTube. Although, I try to focus on just recording whenever possible, which I explain in “Why I Never Punch and Roll.” However, I still do when my clients require it.
How to Save Highlighted Sections Like in Adobe Audition
The beauty of recording voiceovers with REAPER lies in powerful, flexible, and non-destructive recording. Now that you know about recording voice overs with REAPER like in Audition, you won’t be telling it to “Save” or “Save As” the part or all of the recorded voice over track you want to export/save. You will “Render” the highlighted selection, which is like when you “Bounce” in Adobe Audition, but much easier to work with. Follow these steps to Render (or “save”) a highlighted selection as a separate file:
1.) Highlight the selection of the voice over recording you wish to save or “Render”.
2.) Click Option + Command + R on a Mac or CTRL + Alt + R on a PC to Render the selection
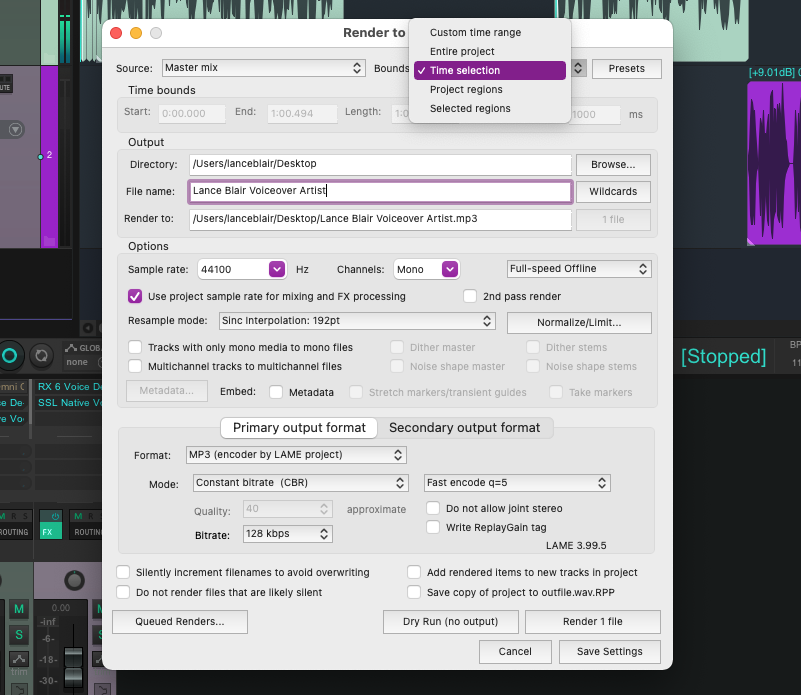
3.) The “Render to File” menu box will open. In the top right corner of it, there is a “Bounds” drop-down menu. Select “Time Selection” See the screen shot below to illustrate what it looks like.
4.) Then select “Render 1 File” in the bottom right corner. It will save to whatever directory you choose in the menu box and in whatever format and resolution you choose.
How to Batch Process for Recording Voiceovers in REAPER
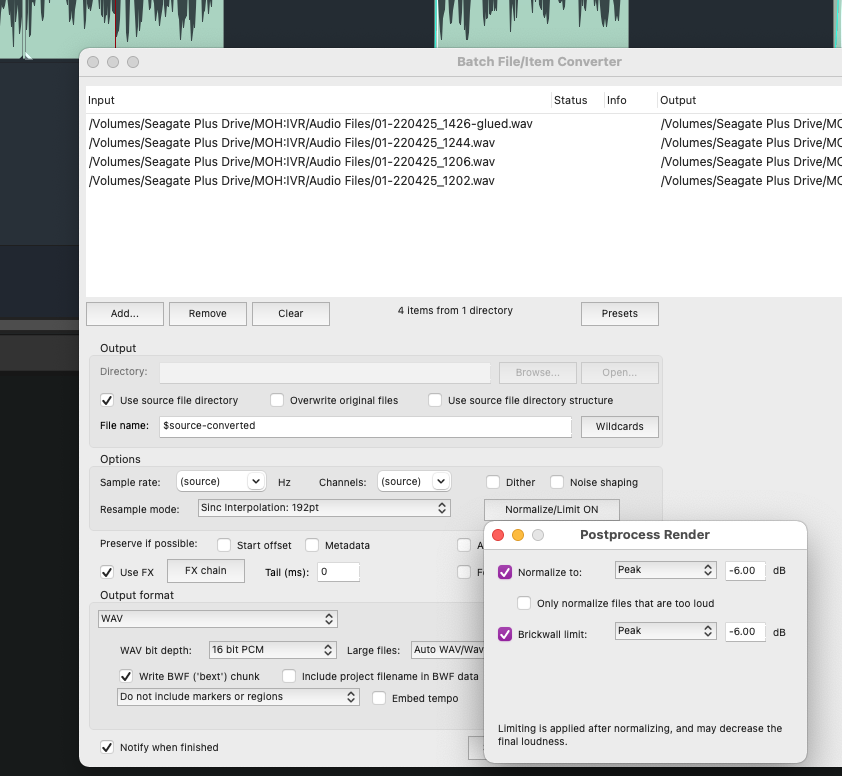
Everyone loves the Batch Process capability in Adobe Audition and other DAWs, right? Well, you can Batch Process in REAPER too. For example, a colleague asked me how to batch process his session files to normalize them to -6 dB and add a Compander. Here’s how:
Go to File > Batch File/Item Converter
Select “Add” Button on the top left to add files
Click on “Normalize” and enter the parameters (-6 dB in this case)
Then click “Use FX” on the left and add the Compander FX you want to use.
Finally, choose “Convert All” in the bottom right (under the Postprocess Render Menu in the image below).
How to do Spectral Edits in REAPER
The popular Healing Tool in the Spectral Edit view of the Adobe Audition Waveform Editor is a very powerful and simple to use voice over recording resource. Well, it’s not the same for recording voiceovers with REAPER, but it works very well. You can’t just mop up a blob of offending sound and hope it sounds better. But you can get in really tight with an area and apply all kinds of settings to it like gain, compression, fade, and gate in order to make it sound better.
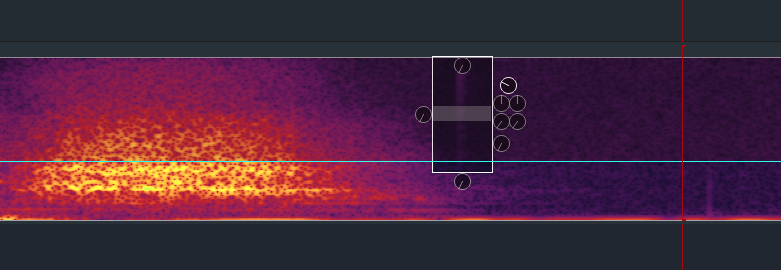
First, right-click on the item you want to fix, (it’s best to make a small focused area by splitting at the cursor) then choose “Spectral Edits” > “Add Spectral Edit to Item”
The Item will convert to the Spectral View, and now you can zoom in and set and adjust a box around the offending frequencies.
This box will have several black knobs around it. These are the controls, and as you hover over them they will let you know what they are: for example “High Frequency Fade” or “Gain” etc.
In the picture below, for example, I’ve put a box around a little click noise and I’ve turned the gain down on it. Easy-peasy!
Additionally, you can make a shortcut to doing Spectral Edits so that you don’t have to right-click and go through the menu. Through the top bar Actions menu I added “Spectrogram: add spectral edit to item” and assigned it to my “/” key. Then I don’t have to right click and go through the menu.
Thanks for reading and good luck!